AWS Onboarding
Panoptica’s frictionless solution scans your cloud resources, including virtual machines, containers, and serverless deployments. Integration is agentless, secure, and easy to set up. Using read-only roles, Panoptica can connect to a single AWS account, or to an entire organization (in Advanced Mode). This enables Panoptica to scan your resources, analyze the configurations, and maintain your cloud security posture.
Privileges requiredThe user performing the onboarding must have sufficient privileges to your AWS environment to deploy Panoptica. We recommend using an AdmistratorAccess policy on the role selected to deploy the script.
For details on the privileges required, see AWS Onboarding - Roles, Policies, and Permissions.
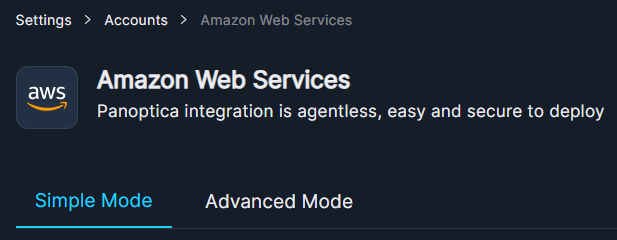
To connect your AWS accounts using the Panoptica console UI, select Settings in the main navigation pane, then the Accounts tab. Choose Amazon Web Services, and follow the on-screen steps, which are detailed below.

To connect your AWS accounts using Terraform, please see AWS Onboarding with Terraform.
Onboarding Steps
Before you start, log into your AWS account. The onboarding process will go smoother if you're logged into AWS beforehand.
Next, decide whether you want to deploy Panoptica in Simple Mode or Advanced Mode.
Both methods deploy a CloudFormation Stack to scan your workloads and serverless functions for CVEs, malware, and weak local user passwords. Simple Mode deploys the default configuration, which is useful for connecting a single AWS account without thinking too much about the options. Advanced Mode adds the ability to customize the scan settings, as well as the option of connecting an AWS Organization.
Click the mode you choose below to view detailed instructions.
Simple Mode
Simple Mode
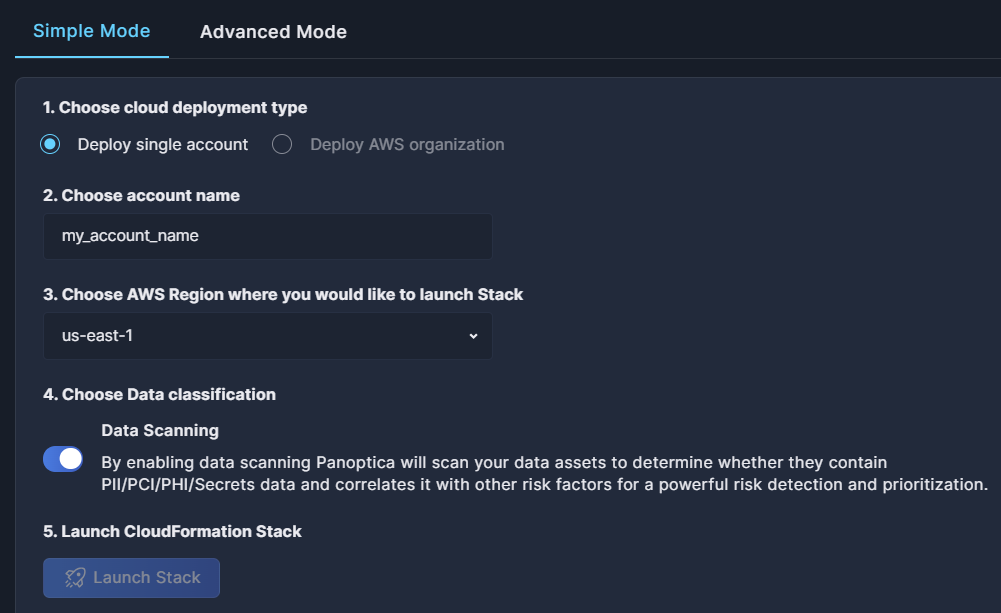
- In Simple Mode, Panoptica can only connect to a single AWS account, so Deploy single account is pre-selected
- Type the Account Name as you you want it to appear in Panoptica's console.
- Select your region from the drop-down box
- Decide whether you want to enable automatic data scanning, to identify PII, PCI, PHI, or secret data in your environment. See Data Type Classification for details. (Data Scanning is in Preview mode, and may not be available in all tenants.)
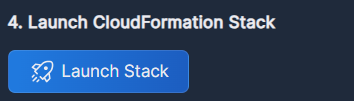
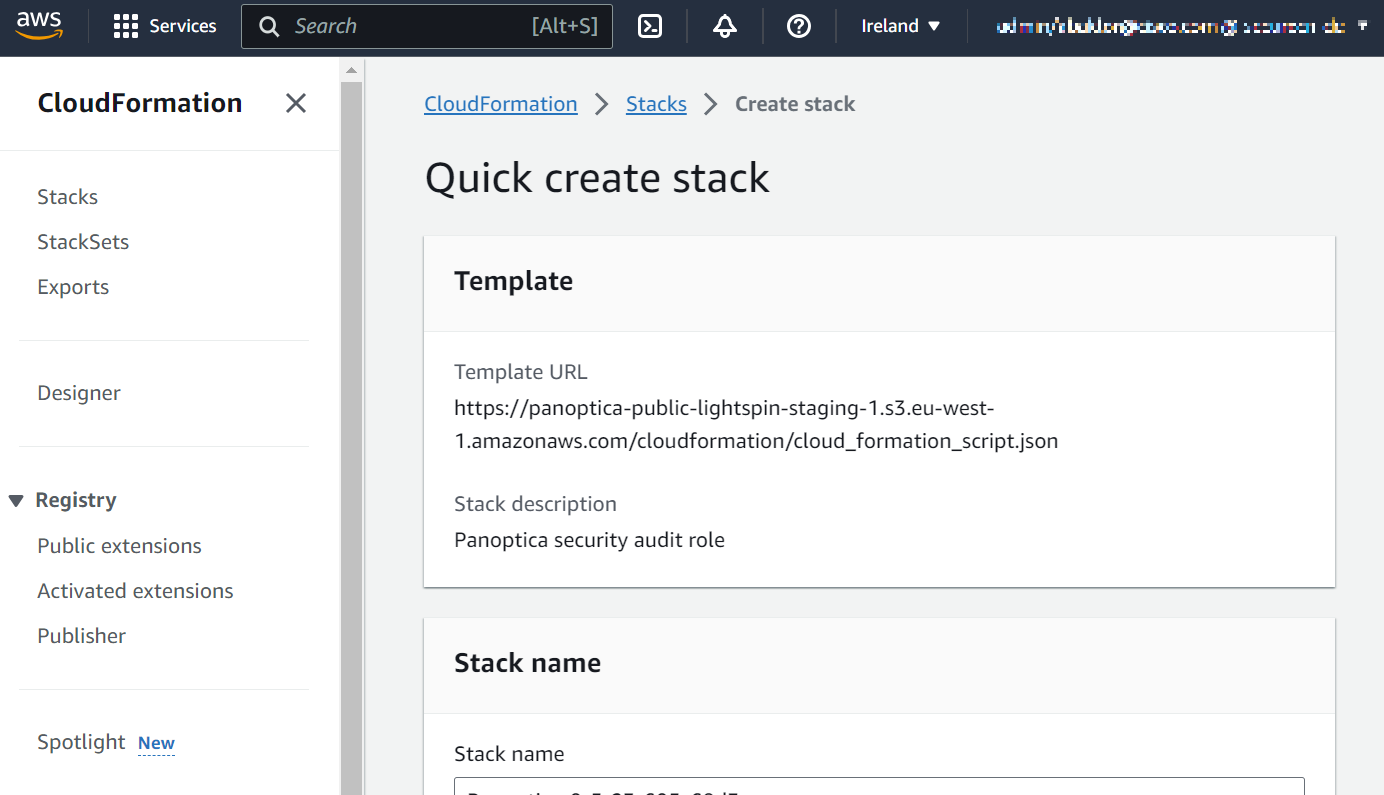
- Once all fields are complete, the blue Launch Stack button will light up. Click Launch Stack to open the CloudFormation template in your AWS environment.
Disable Popup BlockerIf you are running a Popup Blocker, please disable it before clicking Launch Stack
-
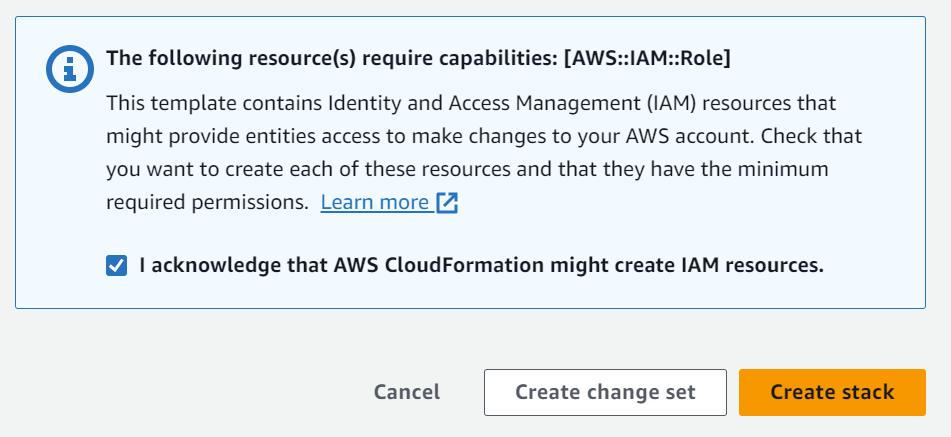
Leave the default settings in the CloudFormation − Create Stack screen, and check the box beside I acknowledge that AWS CloudFormation might create IAM resources.
-
Click Create set
-
Wait a few minutes for the Stack creation to complete, which will be indicated in the Panoptica platform as well as in AWS.

If there are any issues with the stack creation, check the stack events in your CloudFormation console for detailed error messages.
Once the Stack is deployed, Panoptica will start scanning your AWS resources.
Advanced Mode – Single account
Advanced Mode – Single account
-
In Advanced Mode, Panoptica can connect to a single AWS account, or an AWS organization.
Let's start with selecting Deploy single account.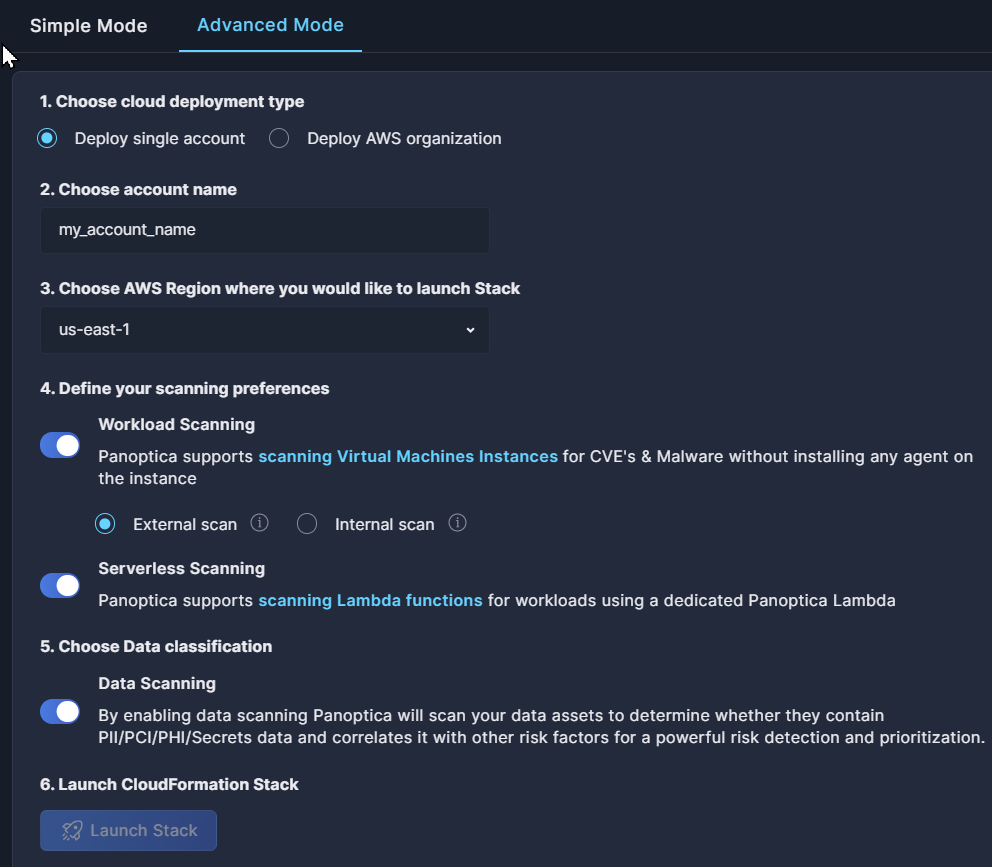
-
Type the Account Name as you you want it to appear in Panoptica's console.
-
Choose your region from the drop-down box
-
In Advanced Mode, you can configure how Panoptica executes workload scans. This is the step where you choose your scanning preferences.
- Enabling Workload Scanning scans your AWS resources for CVEs and malware, as well as local user accounts in your VMs with weak passwords.
In order to minimize impact to your environment, Panoptica takes a snapshot of the EBS volumes attached to the EC2 instances, then copies and converts those snapshots to new EBS volumes.
You can choose where you want the snapshots scanned.- Selecting External scan scans the snapshots in an external Panoptica account. This calls for less internal resources, but requires more data mobility. The snapshots are shared with the external account, not copied.
- Selecting Internal Scan scans the snapshots using a dedicated account in your environment. This improves performance and keeps your data local.
If you select Internal Scan, you'll need to provide the Account ID of the account where the scanning will take place.
- Enabling Serverless Scanning scans your Lambda functions, using a dedicated Panoptica Lambda
- Enabling Data Scanning automatically identifies PII, PCI, PHI, or secret data in your environment. See Data Type Classification for details. (Data Scanning is in Preview mode, and may not be available in all tenants.)
See AWS Workload Scanning - Details for details.
- Enabling Workload Scanning scans your AWS resources for CVEs and malware, as well as local user accounts in your VMs with weak passwords.
ImportantNew AWS accounts have reduced concurrency and memory quotas for Lambda functions. AWS raises these quotas automatically based on your usage.
However, if you experience any performance issues, you may need to reserve or provision additional resources for Panoptica's Lambda function.See the following AWS guides for additional information and assistance:
- Once all fields are complete, the blue Launch Stack button will light up. Click Launch Stack to open the CloudFormation template in your AWS environment in a new browser tab. It's best to make sure you're logged into your AWS account beforehand.
Disable Popup BlockerIf you are running a Popup Blocker, please disable it before clicking Launch Stack.
All of the relevant parameters will be pre-loaded in the AWS CloudFormation − Create Stack screen, according to the information you provided in Panoptica's onboarding procedure.
- Leave the default settings, and check the box beside I acknowledge that AWS CloudFormation might create IAM resources.
-
Click Create set
-
Wait a few minutes for the Stack creation to complete, which will be indicated in the Panoptica platform as well as in AWS.
If there are any issues with the stack creation, check the stack events in your CloudFormation console for detailed error messages.
Once the Stack is deployed, Panoptica will start scanning your AWS resources.
Advanced Mode – AWS Organization
Advanced Mode – AWS Organization
AWS CloudFormation StackSets extend the capability of stacks by allowing you to create, update, or delete stacks across multiple accounts and AWS Regions with a single operation. Using an administrator account, you define and manage a CloudFormation template, and use that template as the basis for provisioning stacks into selected target accounts across specified AWS Regions.
To learn more, see AWS's documentation on Managing stacks with StackSets.
Prerequisites
- Enable StackSet trusted access with AWS Organizations. An AWS guide on how to do this can be found here. Note that this requires an Admin on the management account.
- If you have already onboarded individual accounts in this AWS organization to Panoptica, they must be deleted from Panoptica (via the Accounts table) before starting AWS organization deployment.
Organization Deployment - Create Stack
Before you start, log into your organization management (master) account in AWS, to make sure you have the proper credentials to deploy the stackset.
-
In Advanced Mode, Panoptica can connect to a single AWS account, or an AWS organization.
Let's select Deploy AWS organization this time.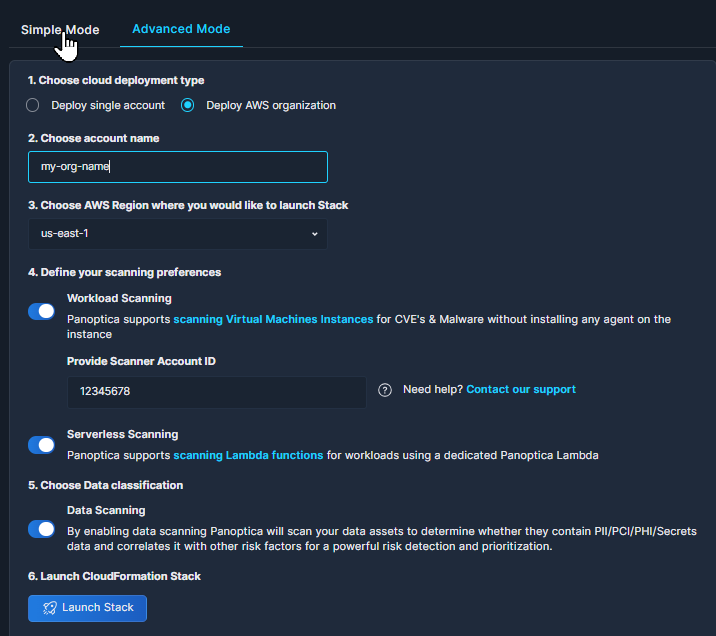
-
Type the Account Name as you you want it to appear in Panoptica's console.
-
Choose your region from the drop-down box
-
In Advanced Mode, you can configure how Panoptica executes workload scans. This is the step where you choose your scanning preferences.
- Enabling Workload Scanning scans your AWS resources for CVEs and malware, as well as local user accounts in your VMs with weak passwords. In order to minimize impact to your environment, Panoptica takes a snapshot of the EBS volumes attached to the EC2 instances, then copies and converts those snapshots to new EBS volumes.
- Snapshots from AWS Organizations are scanned "internally", using a dedicated account in your environment to perform the scans. Provide the Account ID of the account where the scanning will take place.
- Enabling Serverless Scanning scans your Lambda functions, using a dedicated Panoptica Lambda
- Enabling Data Scanning automatically identifies PII, PCI, PHI, or secret data in your environment. See Data Type Classification for details. (Data Scanning is in Preview mode, and may not be available in all tenants.)
- Enabling Workload Scanning scans your AWS resources for CVEs and malware, as well as local user accounts in your VMs with weak passwords. In order to minimize impact to your environment, Panoptica takes a snapshot of the EBS volumes attached to the EC2 instances, then copies and converts those snapshots to new EBS volumes.
ImportantNew AWS accounts have reduced concurrency and memory quotas for Lambda functions. AWS raises these quotas automatically based on your usage.
However, if you experience any performance issues, you may need to reserve or provision additional resources for Panoptica's Lambda function.See the following AWS guides for additional information and assistance:
- Once all fields are complete, the blue Launch Stack button will light up. Click Launch Stack to open the CloudFormation template in your AWS environment in a new browser tab. It's best to make sure you're logged into your AWS account beforehand.
Disable Popup BlockerIf you are running a Popup Blocker, please disable it before clicking Launch Stack
All of the relevant parameters will be pre-loaded in the AWS CloudFormation − Create Stack screen, according to the information you provided in Panoptica's onboarding procedure.
- Leave the default settings, and check the box beside I acknowledge that AWS CloudFormation might create IAM resources.
-
Click Create set
-
Wait a few minutes for the Stack creation to complete, which will be indicated in the Panoptica platform as well as in AWS.
If there are any issues with the stack creation, check the stack events in your CloudFormation console for detailed error messages.
Once the Stack is created, you're ready to define and deploy the StackSets for your organization.
Organization Deployment - Define StackSets
- Once all resources are created successfully, click StackSets from the menu to the left in your AWS management console.
Select the PanopticaSecurityAudit StackSet that was created.
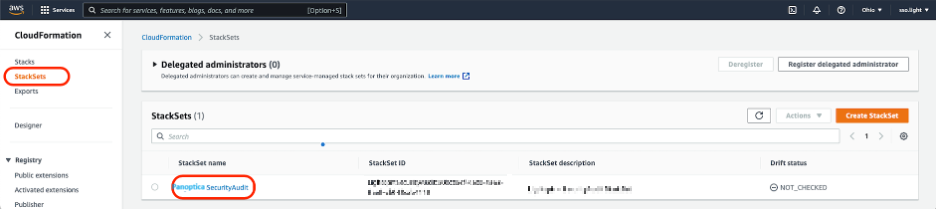
- Click the Actions drop-down menu and select the Add stacks to StackSet option.

- Set deployment targets:
We recommend onboarding the entire Organization, but you can choose to onboard accounts from specific OUs (Organizational Units) if you prefer.

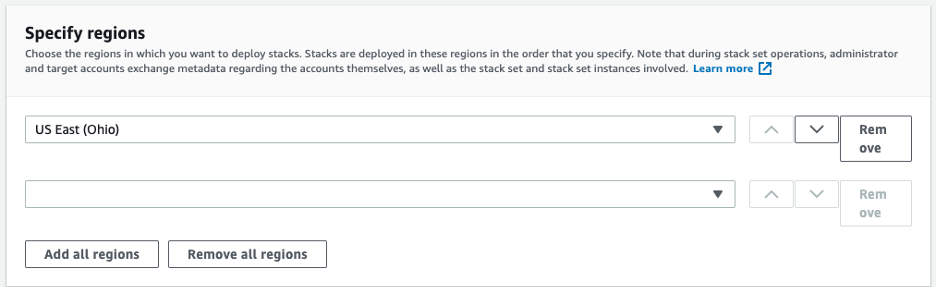
- Specify regions:
Select the region in which the stack will be deployed. from the drop-down list. Once done, click Next.
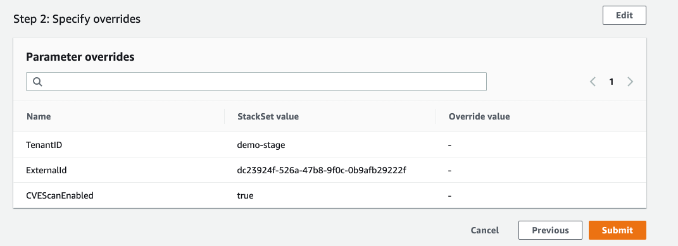
- Click Next again in the following screen.
- After the final review click Submit to start the deployment.
Congratulations! You can now view the “Stack instances” tab to see the status of each account's deployment.
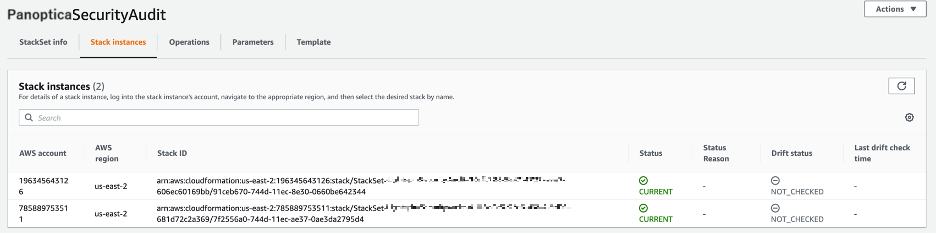
Each account that was successfully deployed should be onboarded and scanned by Panoptica in a matter of minutes. You can see the accounts and their statuses in Panoptica’s Accounts page.
Note:For larger Organizations, the initial scan of all accounts may take some time to complete.
Roles and PermissionsSee AWS Onboarding - Roles, Policies, and Permissions for details concerning the roles and policies created when connecting your AWS account to Panoptica.
Edit Scanning Preferences
To change the scanning preferences after deploying your AWS account, simply update the stack configuration in the CloudFormation console.
To change the scanning preferences for an AWS Organization, update the stack configuration of the root account.
- Log into your AWS account and browse to the list of stacks under CloudFormation.
- Select a stack, and click Update.
- Select Use existing template, and click Next
- Toggle the true / false option under each of the scanning preferences:
- CVEScanEnabled
- DataClassificationEnabled
- ServerlessScanEnabled
- If you have enabled CVE Scanning, add your AWS Account ID to ScannerAccountID.
Do not change any other parametersLimit your changes to the four parameters listed here. Editing any other parameters in the template could cause the deployment to fail.
- Click Next, then click Next again.
- Check the box beside I acknowledge that AWS CloudFormation might create IAM resources.
- Click Submit
Refresh the page to see UPDATE_COMPLETE appear under the stack name.
Where to edit an AWS configurationWhile there is an Edit option for deployments listed in the Accounts tab of the Panoptica console UI, changing the scanning preference there will generate a new CloudFormation stack. This could be useful if the original stack has been corrupted or deleted, but is not always the best practice.
To change the scanning preferences of a functioning AWS deployment, we recommend editing your existing CloudFormation Stack, as described above.
Updated 10 months ago