Oracle Onboarding
Panoptica’s frictionless solution quickly scans your Oracle Cloud Infrastructure (OCI) tenancy, covering inventory management and essential security findings. Integration is agentless, secure, and easy to set up. Follow the steps below to create a secure "read-only" role, and you'll start seeing the scan results in minutes.
To connect your Oracle Cloud Infrastructure (OCI) environment to Panoptica, you create a fingerprint—made up of a Panoptica user, a group, and a policy—then validate it with a public key.
Note:Sufficient privileges to your Oracle environment are required in order to configure the fingerprint.
To get started, select Settings in the navigation pane, then the Accounts tab.
Choose Oracle Cloud, and follow the on-screen instructions, which are detailed below.

Create Fingerprint
The first steps to connecting Panoptica to your Oracle Cloud Infrastructure are carried out in the Oracle Cloud Console. Log into your OCI account to create a user, a group, and a policy.
- Create a user
- In the Oracle Cloud Console, browse to Identity > Domains > Default domain > Users
- Create an OCI user in the default domain using the email address: [email protected]
- Take note of the User OCID.
- Create a group
- Still in the Oracle Cloud Console, browse to Identity > Domains > Default domain > Groups
- Create a dedicated group for the Panoptica integration.
- Add the user you created in Step 1 above to this group.
- Create a policy
- Browse to Identity > Policies in the Oracle Cloud Console
- Create a policy on the root compartment from the common policy template: 'Let auditors inspect your resources'
- Attach the policy to the group created in Step 2 above
- Retrieve the Tenancy OCID of your Oracle account, which you'll find under your Profile.
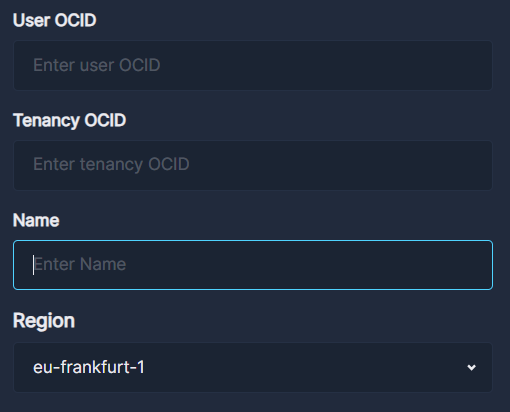
Add to Panoptica
Now return to the Oracle Cloud onboarding page in the Panoptica console
- Enter the User OCID retrieved in Step 1 above
- Enter the Tenancy OCID for your Oracle account, retrieved in Step 4 above.
- Enter a unique Name for the OCI connection, as you want it to appear in the Panoptica platform.
- Select your region from the drop-down list
Create IDS
- Generate an API Key for the user created in step 1 above.
- Choose the Paste a public key option.
- Copy the public key that appears on the Panoptica platform. Look for the Copy icon in the corner.
- Paste the key you copied into the Public Key field on the Oracle Cloud Platform, and click Add.
- Validate if the fingerprint below matches the API Key Fingerprint created in the previous step.
Now you're ready to finish the deployment. We recommend waiting 30 seconds before clicking Check Credentials to make sure Oracle has finished updating the policy.
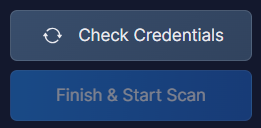
NoteIf Panoptica reports that the credentials are not valid, wait another 30 seconds for Oracle to finish updating the policy, and try again.
Once your credentials check out, the Finish & Start Scan button will become active. Click it to, well, finish and start scanning.
Updated 10 months ago